Observation when reversing, including:
Blindspots and vision block outs.
Using the mirrors and looking through the rear window.
Speed control when reversing
Steering control when reversing
Selecting reverse gear
Three point turns
Use of reversing aids if fitted to the vehicle when reversing.
Facts and Tips.
Many pedestrian crashes involve children being hit by a reversing vehicle. Many of these could be prevented by taking a little extra care with speed and observation when reversing
Turning your head and looking out the back window can help your sense of direction.
Learning Goal
Use your eyes to scan the driving environment for important information and hazards.
Learning Content
Scanning the driving environment including: Distance. Look as far ahead as possible. Turn head to see as far as possible in curves.
Surface. Scan road surface for road markings as well as hazards such as pot holes or debris.
Sides. Look for road signs, entering traffic, pedestrians and other hazards. Scan beyond the edges of the road.
Mirrors. Regularly check following traffic movement
Instruments. Check vehicle instruments, especially speed, using eye movement only with minimum attention diverted from the road.
Facts and Tips
The driving environment changes rapidly. Avoid looking at any single object for too long.
Slow down if vision is limited, for example on a crest or curve.
Learning Goal.
Change gears smoothly and efficiently to suit road conditions, speed and vehicle requirements
Learning Content.
Position and use of gear lever
Coordination of clutch, accelerator and gear lever
Changing up and down gears according to speed
Braking and changing down gears to prepare for a corner
Selecting gears in an automatic vehicle
Facts and Tips
Gear changing, like steering, is primarily a physical skill that requires judgement, timing, technique and coordination. Improvement only comes from practice.
Plenty of practice now will make future learning easier.
A common mistake is to rush when changing gears when learning.
Pausing for a moment in neutral can help make gear changes smoother.
Selecting first {L} or second {S} gear in an automatic vehicle will help reduce the load on the brakes on long downhill sections.
Remember to check the mirrors before slowing down.
Learning Goal.
Use a smooth effective method of steering
Learning Content.
Hand over hand method of steering
Pull/Push method of steering
Hand position on the steering wheel
Look in the direction of turn to see hazards earlier
Facts and Tips
Pull/Push steering { sometimes called shuffling } can be used for all turns and manoeuvres
Hand over hand steering is an effective method for manoeuvres and tight turns
Correct hand position improves control and reduces fatigue.
Learning Goal.
Move the vehicle from and return to the kerb.
Learning Content.
Adjusting and securing seatbelts
Starting up and shutting down the engine safely
Selecting gear for moving off
Coordination of clutch and accelerator
Use mirrors before moving off and braking
Use of signals for leaving and returning to the kerb
Check blindspots before leaving, or returning to the kerb
Choosing a safe gap to move from the kerb
Use of two stage braking ” Set up and Squeeze”
Use of park brake to secure the vehicle when stationary, or when moving off uphill.
Facts and Tips.
You must signal for five seconds before leaving the kerb.
Correct braking is done in two stages, first put light pressure on the brake peddle and pause {set up the brakes} then progressively apply the necessary braking pressure.
Two stage braking {set up and squeeze} improves braking effectiveness. reduces the likelihood of skidding and provides better control.
When stopping at a stop line you must stop completely before reaching the line, and as close as possible to the line.
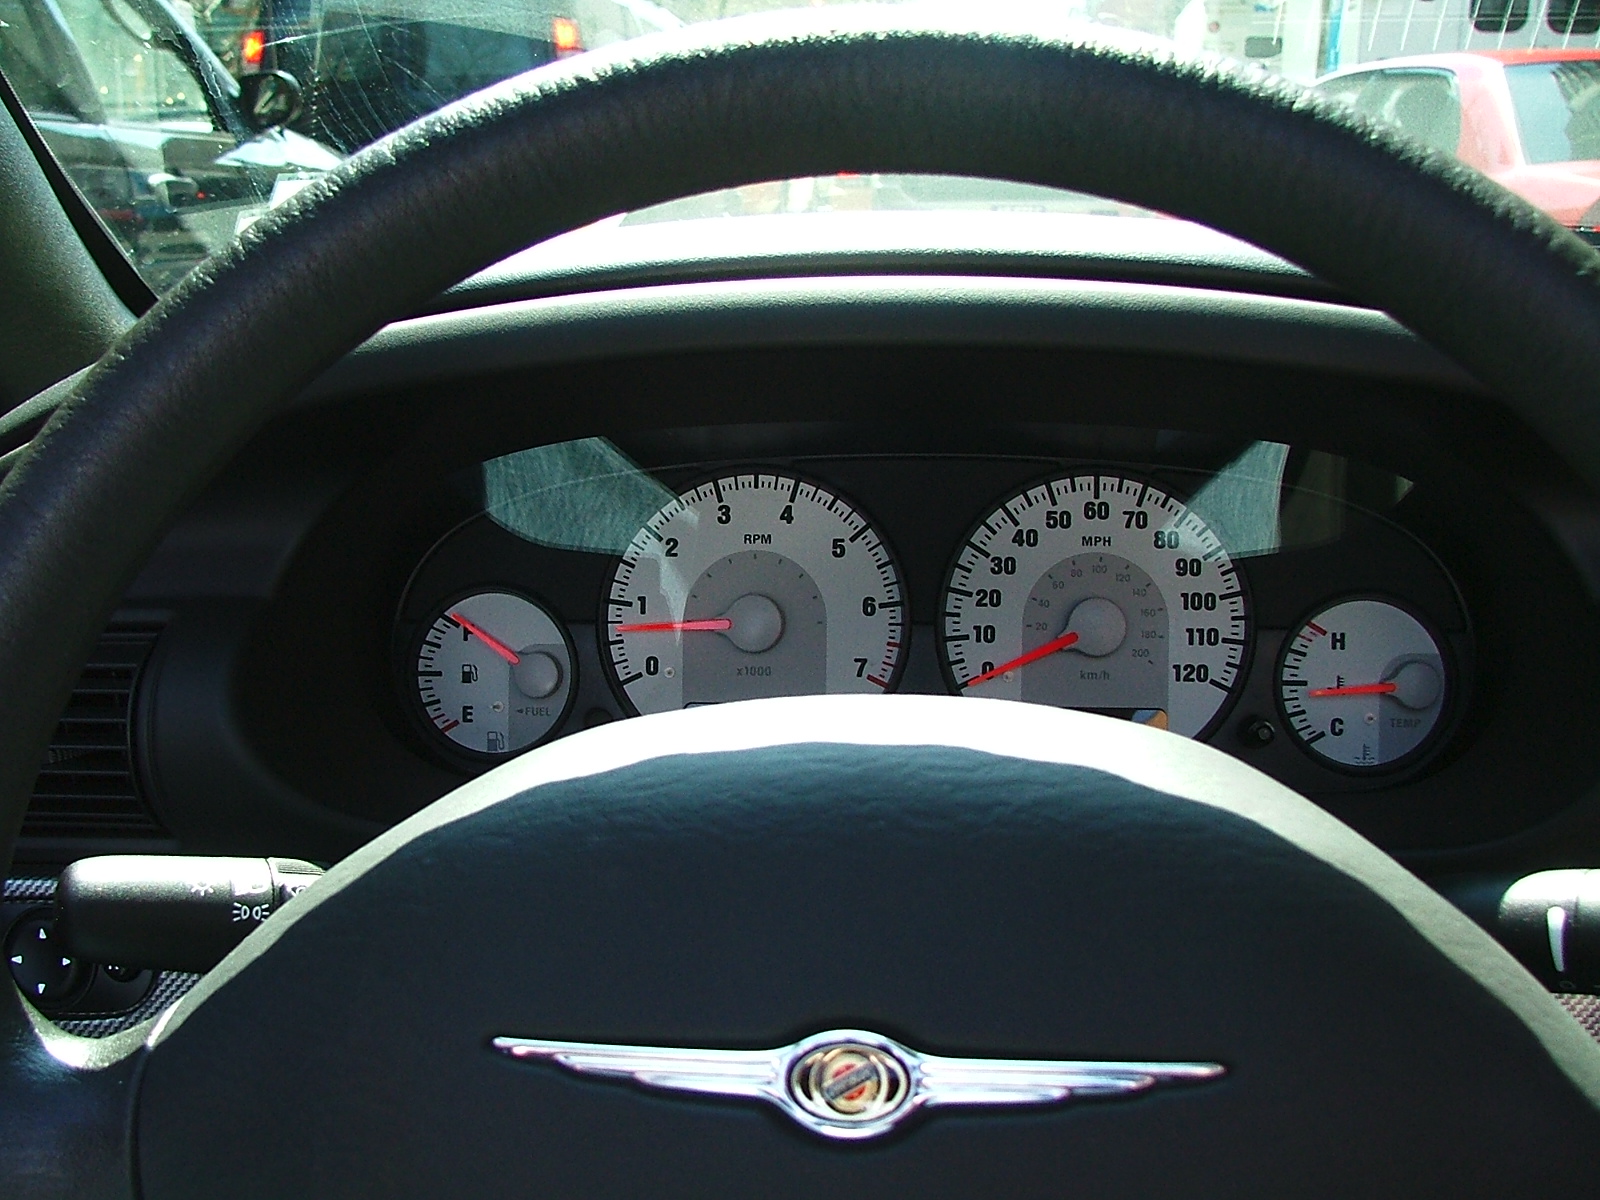
Learning Goal.
Locate and understand the function of controls, gauges and warning lights
Learning Content.
Foot controls: accelerator, brake and clutch
Gear lever and gear positions
Park brake
Steering wheel
Signals and lights
Ignition switch and steering lock
Windscreen wipers and washers
Mirror adjustments and blindspots
Gauges and warning lights
Door locks and windows
Boot, bonnet and fuel cap release
Facts and Tips
Relevant information about your vehicle’s controls can be found in your owner’s manual.
Learn to use your windscreen wipers now rather than waiting until you get caught in the rain.
If you are unfamiliar with any control, do not attempt to learn how to use it when you are driving, pull over and learn to use it without taking your attention from the road.
Learning Goal.
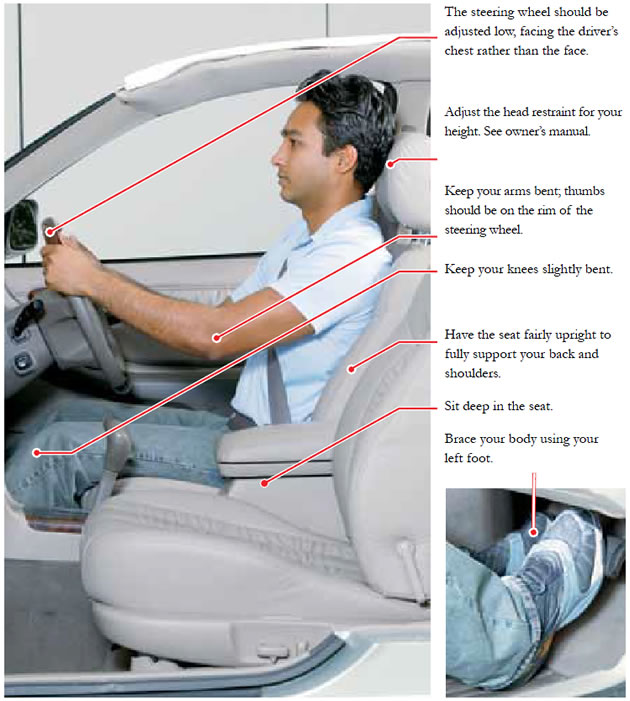
Make all the required adjustments to enable safe, comfortable and effective control of the vehicle.
Learning Content.
Location and operation of seat adjustments
Location and operation of steering column adjustments
Adjust driver’s seat position for comfort, safetly and good accessibility to controls
Correct fastening and adjustment of seatbelt
Adjust rear view mirrors
Identify vehicle blind spots
Facts and Tips
A good driving position promotes effective car control and helps reduce driver fatigue.
Correct adjustment of the seatbelt reduces the risk of injury in a crash.
Hey cameron thanks for all your help !! Just letting you know that i did pass and if it weren’t for your lesson i would have failed miserably !! Thanks again
Signalling
You must indicate for long enough to give sufficient warning to other drivers and pedestrians before entering a roundabout when turning left or right.
You must also indicate, if practicable, on exit when going straight ahead.
That way, people around you know exactly where you’re headed.
Traffic signals
Some roundabouts may have traffic lights on an approach.
When the signals are operating you may be stopped for a short time by a red light to allow other traffic to access the roundabout.
When the signals are not operating or when you proceed after being stopped, you are still to proceed into the roundabout under the normal roundabout rules.
Giving way
Approaching a roundabout: Vehicles entering a roundabout must give way to any vehicle already in the roundabout. Giving way at a roundabout: means the driver must slow down and if necessary, stop to avoid a collision.
When entering, you must give way to all vehicles, including bicycles, already on the roundabout. So slow down or stop if necessary. Only enter when there is a safe gap.
roundabout left turn
Going left
Slow down and prepare to give way as you approach the roundabout.
On approach you must be in the left lane unless otherwise marked on the road, and indicate a left turn.
You must give way to traffic already on the roundabout if there is any risk of a collision.
Enter the roundabout when there is a safe gap in the traffic.
Stay in the left lane. Keep your left indicator on until you have exited the roundabout.
roundabout right turn
Going right
Slow down and prepare to give way as you approach the roundabout.
On approach you must be in the right lane unless otherwise marked on the road, and indicate a right turn.
You must give way to traffic already on the roundabout if there is any risk of a collision.
Enter the roundabout when there is a safe gap in the traffic.
Stay in the right lane. You must indicate a left turn just before your exit unless it is not practical to do so.
roundabout straight
Going straight ahead
Slow down and prepare to give way as you approach the roundabout.
On approach you can be in either lane, unless otherwise marked on road.
When going straight ahead you do not need to indicate on approach.
You must give way to traffic already on the roundabout if there is any risk of collision.
Enter the roundabout when there is a safe gap in the traffic. You must indicate a left turn just before you exit unless it is not practical to do so.
The rules for slowing down, giving way and signalling when approaching and exiting at roundabouts are the same for single lane and multi-lane roundabouts.
Roundabouts: risks to watch for
Take extra care whenever you drive in a roundabout.
Keep an eye out for cars that are leaving the roundabout.
Be careful if changing lanes in a roundabout, particularly
when leaving.
Look out for vehicles that are making a full turn.
Watch for bicycles, long vehicles and motorcycles.
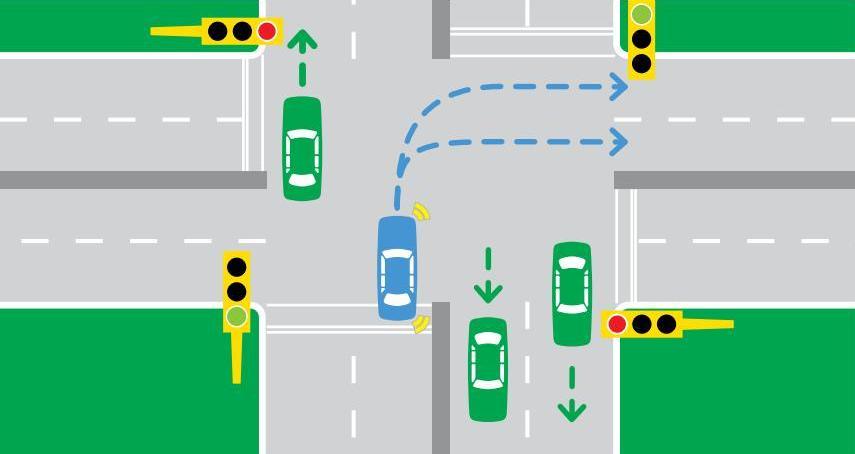
Traffic lights When turning right at traffic lights:
Enter the intersection as shown in the diagram, unless a sign indicates otherwise
or there is a red right turn arrow displayed.
Wait until oncoming traffic clears or breaks and then turn safely.
If the lights change to yellow or red while you are in the middle of the intersection, you are allowed to turn right.
You must turn as soon as it is safe to do so. Be sure your front wheels and car are straight and not blocking the oncoming traffic.